Intro #
In this tutorial, we will explain to you how to Login to your event and Access your event details. This tutorial video will explain everything you need to know before you start recording at your Event.
Login to your event #
For these steps, please make sure your smartphone is connected to the internet
QR-Codes #
To start using iRewind ONE APP for your event, you first need to log in. Every event has a specific QR code uniquely linking the device at hand to our system and allowing you to control the recording and uploaded footage. You can either create the QR code on your own in the iRewind Dashboard, which is explained in a separate Tutorial on “Creating QR-Codes”, or you will receive your event QR code from your iRewind Account Manager.

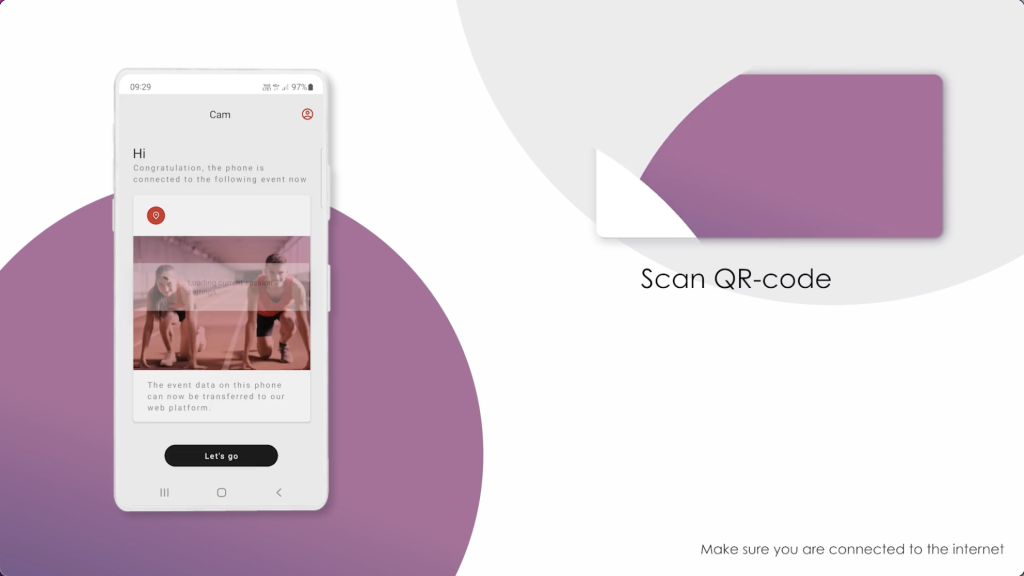
For this step, you should have your event-specific QR-Code readily available for login. Now open the iRewind ONE App on your device and you will be prompted to Scan the QR-code to log in to your event. If you already used the iRewind ONE App before, you just scan the event QR-Code. The iRewind One App automatically logs you in and you are now one step closer to recording footage for your event.
Installation / Permission Prompts #
If it’s the first time you are using the iRewind ONE App or if you reinstalled it, you will be prompted to allow the iRewind ONE App to collect and transmit device data to our servers. These are necessary for you and our team to monitor and control what is happening with the device.
Accept the prompt and you will then be prompted to allow the iRewind ONE App to: Appear on Top. This is necessary to be able to control the app remotely if the phone screen is off or the app is in the background
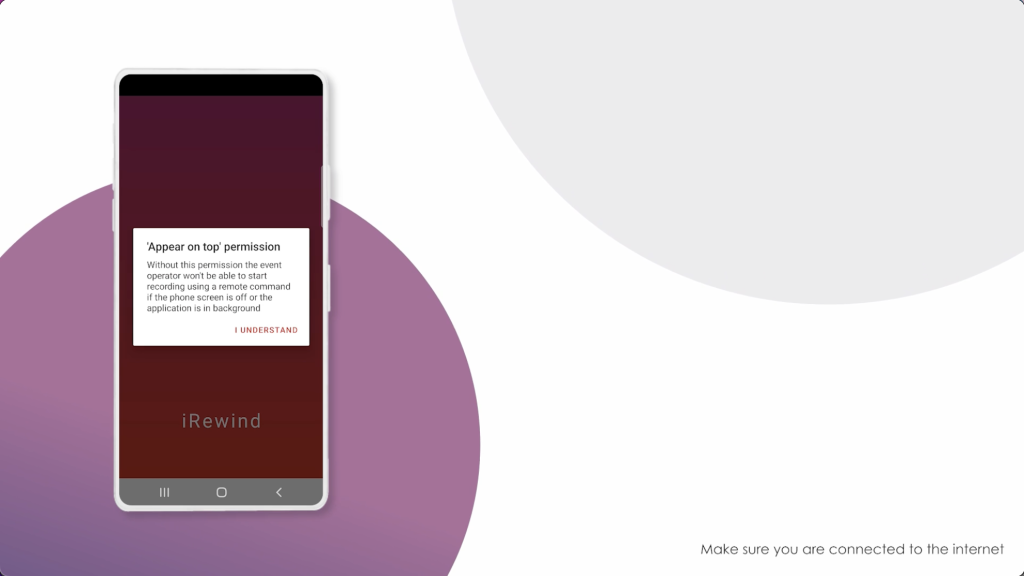
For ease of use, “Toggle OFF” all the apps you can, except the iRewind ONE app. Once done, tap the little arrow at the top left to return to the previous screen.

In case this screen does not appear:
- Go to the settings menu and choose “Apps”
- Tap up here on the three dots and choose “Special Access”
- Then choose “Appear on top” and “Toggle OFF” all the apps you can, except the iRewind ONE app.
Now, let’s go back to the App.
You will be prompted to allow the iRewind ONE App to:
- Take pictures and record video
- To record audio
- Allow access to the precise Location
Select “While using the app” to allow those access permissions for Rewind ONE.
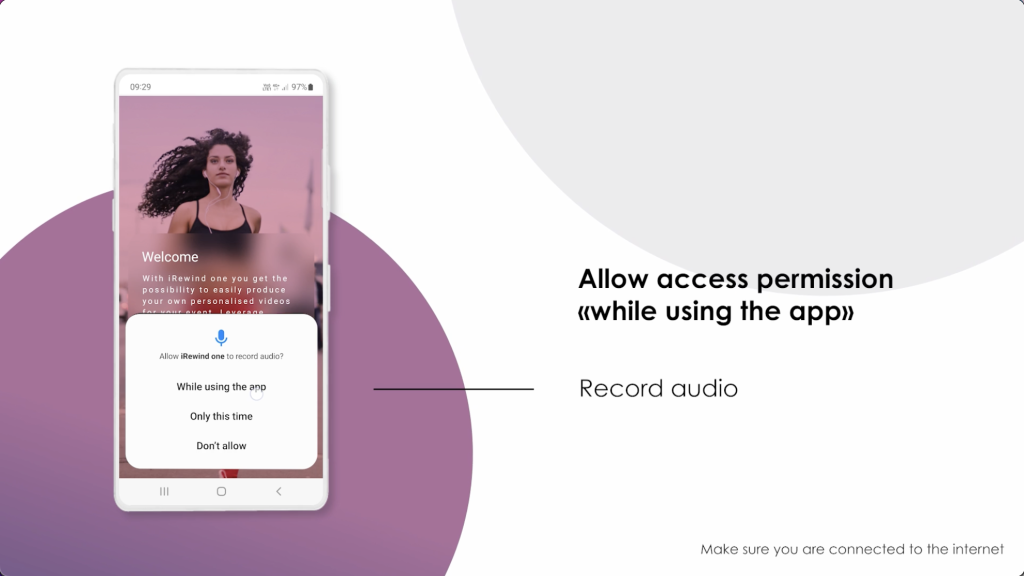


As a side note: these permissions can also be requested after a major Update of the Android OS.
Scanning the QR-code #
Once the permissions are granted, you are now able to scan the event QR code and log into your particular event to get one step closer to recording footage for your event.
If the QR code is expired or not valid for any reason, the app will show a notification pop-up mentioning exactly that. In that case, press “YES” and make sure you are scanning the correct QR code for your event or that it’s still valid. More details on what to do if that happens can be found in the video tutorial “Creating QR-codes”.
Event Details #
Once you’ve successfully scanned the QR code, you are logged in and you can see the Event Details screen. Let me show you what information you have access to here and what’s important for you to know.
Camera Identification #
At the top of your screen, you can see the “Cam ID” number.
This is a unique number for each camera for each event you are preparing.
If you login with a second, third, or fourth camera on the same event, they will each have their own individual Cam ID number, allocated automatically, depending on the order in which you log them in.
Event information #
The Event Name and Thumbnail image of the event you are logged into are now displayed in the middle section of your screen. In case the device is not connected to the internet when you scan the QR-code, the Camera ID number and Event Name will not be displayed until you bring the device online. You will be able to record footage and use the camera, but please make sure you are connected to the internet to guarantee proper activation of your event in your iRewind ONE App.
Profile information #
Now, let’s go into more detail. On the top right corner, you can see the User Profile icon.
This takes you to the “Profile information tab”, giving you more technical information about how the camera recording is configured.
But more importantly, this is the menu that enables you to change the QR-Code while your current event is ongoing. Just scroll all the way down and you’ll find the button to rescan the QR-Code.
This can be useful if you need to change the initial QR-Code and you received another one from your iRewind Account Manager or you created a new Code by yourself. We explain why this could happen in our Tutorial “Create QR-Codes”
Main screen #
Now that you know how to handle this brief setup, whatever comes your way, let’s go back to the Main screen. From there you will be able to explore further how to use the camera and the Record Mode. That’s where the real magic starts!
We will show you how this works in our next Tutorial about Recording and using the Camera. Make sure to check it out.